First of all use apt-get to install Scgi
sudo apt-get install libapache2-mod-scgi
Now enable module for apache
sudo a2enmod scgi
All For Web Masters
First of all use apt-get to install Scgi
sudo apt-get install libapache2-mod-scgi
Now enable module for apache
sudo a2enmod scgi
First of all lets add user
adduser maximus
enter password and confirm information, now add user to sudoers
gpasswd -a maximus sudo
now open for editing ssh config
sudo nano /etc/ssh/sshd_config
find
PermitRootLogin yes
and change it to
PermitRootLogin no
Restart ssh service and your done.
service ssh restart
Open SSH config file
nano /etc/ssh/sshd_config
There should be string Port you can use Ctrl+w to search for it, so you will find something like
Port 22
change 22, for example to 21989, now restart SSH service
service ssh restart
You can also open port if it’s closed
sudo ufw allow 21989/tcp
When trying to install teamviewer on ubuntu 14.04 and up you will get dependency problem, this is solution how to install it!
sudo dpkg --add-architecture i386
sudo apt-get update
sudo apt-get install gdebi
wget download.teamviewer.com/download/version_10x/teamviewer_linux.deb
sudo gdebi teamviewer_linux.deb
When you understood that many email are not delivered in your inbox which are sent from (Hotmail,Google or custom server) first of all you must check logs whats happening, if dns is configured properly and you see “Could not complete sender verify callout” in your logs which you can check in whm “Email”->” Mail Delivery Reports ” then this is because of Sender Verification Callouts
Use callouts to verify the existence of email senders. Exim will connect to the mail exchanger for a given address to verify it exists before accepting mail from it.
we can fix it very fast just go to “Exim Configuration Manager” in WHM and search for “Sender Verification Callout” check off which by the way is default, click save and test your mails.

This is tutorial how to enable NFS backup for WHM running on CENTOS 6
first of all we need to install NSF soft on centos use this commands to do this
yum install nfs-utils nfs-utils-lib
also install Portmap if it’s not installed
yum install rpcbind
Now we must start services
chkconfig nfs on
service rpcbind start
service nfs start
Okay now everything is installed and we must create directory and mount NFS
mkdir /home/nfsdir
mount -t nfs 15.15.45.65:/folder /home/nfsdir
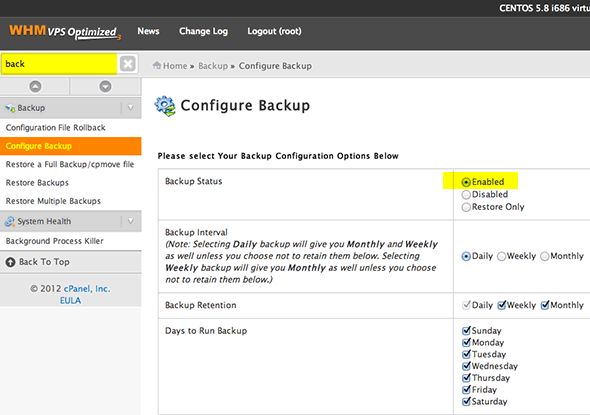
Now just go to Backup Configuration in whm and set Default Backup Directory to in our situation /home/nfsdir, that’s all now backup will be saved in NFS which is mounted in your system.

By default Cpanel comes with apache only, if you need to install Nginx,Varnish to make faster service you can use several plugins, I will start with free one and then tell about shareware.
ApacheBooster
Plugin comes with already configured Nginx and Varnish, to install and use terminal
wget http://prajith.in/downloads/apachebooster.tar.gz
tar -zxf apachebooster.tar.gz
cd apachebooster
bash install.sh  or sh install.sh
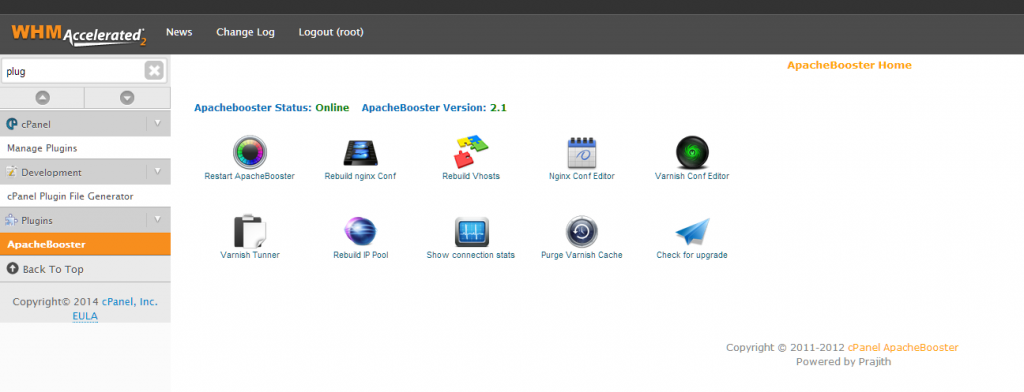
after installation you will see apachebooster in WHM plugins

You can configure Varnish and Nginx from here, and also purge varnish cache if needed. I think this plugin have have all what is needed but if your searching for more you can buy Cpanel plugin from Unixy, I think they have same functions but anyway it up to you which one to choose.
Most of all servers come with installed apache,php and mysql but but without vernish and webmin we need to install this soft manually on Debian or ubuntu.
We will start to upgrade out system:
apt-get update
apt-get dist-upgrade
Now if apache is not installed we should install it:
apt-get install apache2
install mysql server:
apt-get install mysql-server
install PHP:
apt-get install php5 php-pear php5-mysql php5-common php5-mcrypt php5-curl php5-cli php5-gd php5-dev
install curl(is needed for vernish) and unzip(if not installed):
apt-get install curl unzip
Now we must install dependencies for webmin control panel:
apt-get install perl libnet-ssleay-perl openssl libauthen-pam-perl libpam-runtime libio-pty-perl apt-show-versions python
Wget webmin and install it:
wget http://prdownloads.sourceforge.net/webadmin/webmin_1.660_all.deb
dpkg –install webmin_1.660_all.deb
at least install vernish:
curl http://repo.varnish-cache.org/debian/GPG-key.txt | apt-key add –
echo “deb http://repo.varnish-cache.org/debian/ wheezy varnish-3.0” >> /etc/apt/sources.list
apt-get update
apt-get install varnish
Now all software installed you can access your webmin control panel using https://yourip:10000
Nginix is great web server it’s much faster then apache server, but we need to make some tasks to install and configure Nginix with PHP.
1) Install mysql server and other tools which we need
apt-get install gcc libpcre3 libpcre3-dev zlib1g zlib1g-dev libssl-dev openssl libxml2-dev libevent-dev mysql-client mysql-server
2) Normally debian already includes Nginix
apt-get update
apt-get install nginx
3) Now we can install PHP and extensions
apt-get update
apt-get install php5 php5-fpm php-pear php5-common php5-mcrypt php5-mysql php5-curl php5-cli php5-gd php5-dev
4) Start all services
service nginx start
service php5-fpm start
service mysql start
5) Start php,mysql,nginx at start
update-rc.d nginx default
update-rc.d mysql defaults
update-rc.d php5-fpm defaults
There was a problem creating the parked domain. Show Details
Error from park wrapper: Using nameservers with the following IPs: xxx.xxx.xxx.xxx,xxx.xxx.xxx.xxx Sorry, the domain is already pointed to an IP address that does not appear to use DNS servers associated with this server. Please transfer the domain to this servers nameservers or have your administrator add one of its nameservers to /etc/ips.remotedns and make the proper A entries on that remote nameserver.
FIX :
If you have access to WHM you must make this change –
WHM > Tweak Settings > Domains > Allow Remote Domains > On